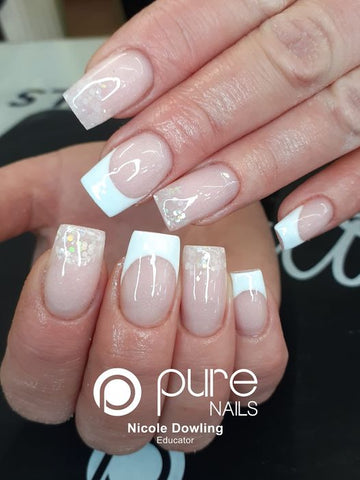
DRUM ROLL...today's blog post is all about reverse french using our beloved Polibuild. This is quite possibly our most asked for blog post; so we are overjoyed to get this out to all of you!
Are you a Nail Tech looking to make your client's nail application a lot easier? Are you extremely busy and feel like you need to save time on your client's nails yet keeping the sets the same/higher standard? If you answered yes to the above questions, you NEED to try Polibuild!
Are you unsure what Polibuild is? Halo PoliBuild is the brand-new product from Pure Nails that combines acrylic and hard gel to create a faultless all-in-one nail system. Halo PoliBuild provides a strong and flexible, light nail enhancement that is perfect for use with Halo Gel Polish.
Gone are the days of perfecting a working consistency; Halo PoliBuild requires zero monomer, mixing and ratios, all that’s needed is our Halo PoliBuild Liquid Control to manipulate the product as you want it, working as fast or as slow as you like. The unique formula of Halo PoliBuild allows for a smooth and flawless finish that is easy to file to create the perfect nail enhancement.

Step 1: Prep OFC!
If you are looking for an in-depth prep blog post, please read our 'Flawless Gel Polish on Natural Nails'. HOWEVER, always remember our golden rule; prep should take between 10 to 15 minutes!
Step 2: REVERSE FRENCH....duh!
Now time to bring the reverse french to life! Once you have applied your tips, start with popping a bead of Cover Pink Polibuild into the centre of the nail. Again, like our previous blogs, dip our Dual Tool into our Liquid Control and pat in the Polibuild close to the sidewalls, making sure the coverage is even. When you get to the smile line, take your Dual Tool (brush side) and shape the Polibuild into a smile line; it is vital that you manage to get the sides of the smile line even in this step. Once you are happy, cure the nail for 60 seconds.
Once cured, get another tiny bead to neaten up the cuticle area. Pat over the bead and shape the Polibuild around the cuticles, make sure it's blended into the previous bead. Cure again for 60 seconds.
Step 3: SMILE LINES!
You now want to define your smile lines. Taking a file, simply just file around the smile line you previously create- making sure both sides are even. Remove the dust from filing with our Prep & Scrub; this also helps to dehydrate the nail further allowing the Polibuild to adhere better.
Reapply our Base Coat to the end of the tip, helping the Poilbuild have something to stick to; cure for 30 seconds.
Now take a very small bead of your Bright White Polibuild and shape it around the smile line, taking it right around the sides and patting it into place. When you are happy with the shape, cure for 30 seconds.
After you have cured your nails, take another small white bead and repeat the last step (this helps to make everything look more seamless).
Now taking Easibuild Clear, paint over the whole nail; this joins the 2 colours together. Apply your slick layer (a thinner layer) firstly and then a thicker layer of clear Easibild-remember to always cap the free edge and apply the gel down the sidewalls. Turn your clients hand upside down for a couple of seconds (this helps to build a natural apex) and then cure for 60 seconds.
Step 4: Finish them off!
Using our Prep & Scrub, remove the inhibition (tacky) layer and then start filing the nail down into a shape you and your client are happy with. Take our Prep & Scrub to remove the dust from the filing and again, this will also help with our Top Coat adhering properly.
To finish off the set, use our Non-Wipe Top Coat and VOLIIA! You are complete; it is THAT simple!
Keep up to date with all our top tips and nail inspo on socials. Make sure you follow us and give us a tag on Instagram @purenailsuk. We look forward to you joining our Halo family!


